How to Build a Tiny House: 10 Steps From Plan to Move-In
Learning how to build a tiny house is one of the most rewarding projects a homeowner can take on. It is also one of the easiest to get wrong. The people who finish with a safe and comfortable home are not always the most skilled. They are the ones who plan the order of work and check the rules before they cut a single board.

This guide shows you how to build a tiny house in ten steps. You will learn how to choose between wheels and a foundation and how to check zoning and set a budget. You will see how framing and insulation and electrical and plumbing fit together and how long a DIY tiny house takes. You will also learn which jobs to hire out and the mistakes that cost builders the most time and money.
Thin walls limit insulation. Compare options in our best insulation for exterior walls guide.
Want the cost side first? See how much a tiny home costs to build.
Before You Start: How Long Does It Take to Build a Tiny House?
Time is the first thing builders underestimate. Owner builders who work on weekends and evenings often take six months to two years to finish a home. Full-time builders with some experience can move faster. A professional builder usually quotes a few months once the plans and permits are ready.
Delays rarely come from the building itself. They come from permits and material deliveries and inspections and changes to the plan. Build a buffer into your schedule and your budget.
Step 1: Decide Between Wheels and a Foundation
This choice shapes everything else.
- Tiny house on wheels. Built on a trailer so you can move it. Size is limited by road rules. In most of the United States a towed home can be up to 8.5 feet wide and 13.5 feet tall. Weight matters too since the trailer and your tow vehicle must handle the load.
- Tiny house on a foundation. Built like a small house on piers or a slab or a crawl space. It can be larger and can meet standard building codes. It is usually easier to finance and insure.
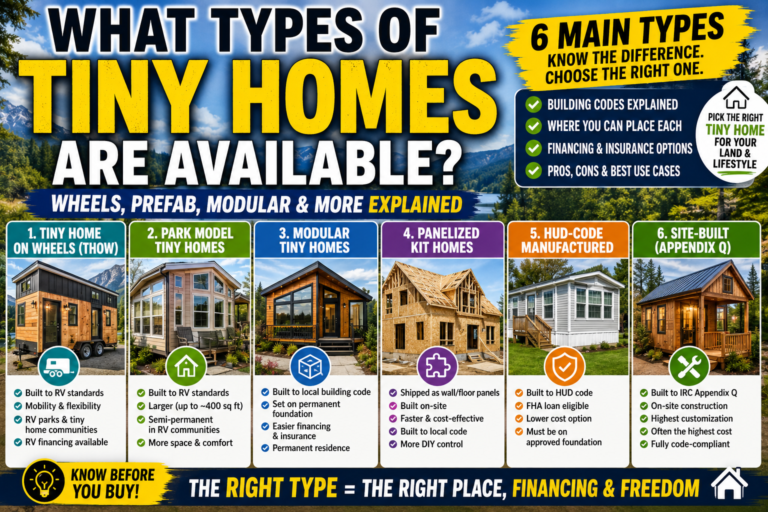
Read our guide to types of tiny homes to see how each category is regulated. If you want more than about 340 square feet you will probably be on a foundation.
Step 2: Check Zoning and Building Codes
Many areas follow the International Residential Code which includes Appendix Q for tiny houses of 400 square feet or less.
Do this before you buy plans or materials. Rules differ by county and city.
- Ask the planning office whether tiny houses are allowed and in what zone.
- Ask which building code applies. Many areas follow the International Residential Code which includes Appendix Q for tiny houses of 400 square feet or less.
- Ask whether a tiny house on wheels is treated as an RV and how long you can live in it.
- Ask what permits and inspections you will need.
If you do not own land yet read our guide on how to buy land for a tiny house before you sign anything.
Step 3: Set a Realistic Budget
Costs vary widely by method and finish level. Our tiny home cost guide puts most professionally built homes between $30,000 and $90,000. Owner builders can save on labor but still pay for materials and tools and permits.
Include these in your budget:
- Materials and tools
- A trailer ($4,500 to $10,000 for a heavy-duty one) or a foundation
- Permits and inspections
- Electrical and plumbing work you hire out
- Insulation and windows
- Appliances and fixtures
- A 10 to 20 percent contingency
For the numbers on a larger build see our 400 sq ft tiny house cost breakdown.
Step 4: Choose or Draw Your Plans
Good plans save weeks of rework. You can buy plans or hire a designer or draw your own. Whatever you choose make sure the plan includes:
- A full floor plan with dimensions
- Framing details and a materials list
- Electrical and plumbing layouts
- Window and door locations
- The trailer or foundation specs
Think about how you live. Where will you sleep and cook and store things? A loft saves floor space but needs headroom and a safe way up. Built-in storage under stairs and benches adds space without adding size. For eight sample layouts to borrow from see our tiny house floor plans guide.
Step 5: Prepare the Trailer or Foundation
Everything rests on this base so it has to be right.
For a trailer: Buy a trailer made for tiny houses with a weight rating that exceeds the finished home. Level it and fix it so it cannot move. Protect it with flashing so water does not rust it. A bare steel deck must be sealed and the frame needs to be tied into the floor system.
For a foundation: Clear and level the site. Dig and pour piers or a slab. Make sure the foundation is square and level before you start framing. Check local frost depth requirements.
Mistakes here are expensive. A base that is out of square affects every wall and window.
Watch the Weight if You Build on Wheels
Weight is the hidden limit on a tiny house on wheels. A finished home often weighs several thousand pounds and many land somewhere around 8,000 to 14,000 pounds depending on size and materials. Your trailer has a gross vehicle weight rating that must exceed the finished weight and your tow vehicle must be able to pull it.
- Add up the weight of framing and sheathing and roofing and windows before you buy a trailer.
- Include appliances and cabinets and fixtures and the water in the tank.
- Leave a margin so you are not at the limit.
- Use lighter materials where you can such as metal roofing and thinner interior panels.
A home that is too heavy is unsafe to tow and may not be legal on the road. Build with the weight in mind from day one.
Step 6: Frame the Floor and Walls and Roof
Framing gives the house its shape.
- Build the floor frame and add subfloor.
- Frame the walls flat on the floor and raise them into place.
- Brace the walls and check that they are plumb.
- Add the roof framing and the loft if you have one.
- Install sheathing on the walls and roof.
Many tiny house builders use standard 2×4 or 2×6 lumber. Lighter framing helps keep a home on wheels within its weight limit. Metal fasteners and hurricane ties add strength against wind on the road. Take your time with measurements. A small error in a small space shows up quickly.
If you want a roof line that is easy to frame look at the A frame tiny house where the roof and walls are one surface.
Step 7: Weatherproof the Shell
A dry shell protects everything you will install later.
- Wrap the walls in a house wrap or a weather barrier.
- Install the roof covering. Metal roofing is popular since it is light and durable.
- Set windows and doors and flash them carefully.
- Seal every seam and edge.
Rain finds weak spots so flashing and sealing matter. Once the shell is closed you can work inside in any weather.
Step 8: Insulate and Control Moisture
Tiny houses have little air volume so humidity and condensation can build quickly. Insulation and ventilation are not optional.
- Choose insulation that suits your climate and your budget. Closed-cell spray foam gives high R-value per inch and helps with air sealing but costs more. Rigid foam and mineral wool are other options.
- Seal all gaps to stop drafts.
- Plan ventilation. A small mechanical ventilator or a bathroom fan and a range hood help remove moist air.
- Watch for thermal bridging where metal framing or the trailer can carry cold.
Poor insulation is one of the most common complaints from tiny house owners. Get this stage right.
Step 9: Install Electrical and Plumbing
These systems carry the most risk if done badly. Many owner builders hire licensed pros for this work and that is a wise move.
Electrical:
- Most tiny houses connect to shore power through a 30 or 50 amp RV-style cord or hardwire to a panel on a foundation.
- Plan outlets and lights before the walls are closed.
- Use a panel with proper breakers and ground fault protection where required.
- Have the work inspected if your area requires it.
Plumbing:
- Decide on water supply and drain connections. A tiny house on wheels often uses a hose connection and a drain outlet. A foundation home may connect to city water and sewer or to a well and septic.
- Use proper venting so drains work and sewer gas stays out.
- Insulate or protect lines so they do not freeze.
- Choose a water heater that fits your space. Tankless units save room.
Solar and batteries are options for off-grid living. They add cost and need careful planning. For more on how off-grid features change the budget see the tiny home cost guide.
Step 10: Finish the Interior and Pass Inspections
Now the house starts to feel like a home.
- Install drywall or wood paneling.
- Add flooring and trim.
- Install cabinets and counters and fixtures.
- Set the appliances.
- Paint and finish.
- Complete required inspections and get your certificate of occupancy where one applies.
Keep furniture and finishes light and multi-purpose. Weight and space both matter. A well-organized interior makes a small home feel larger.
How to Save Money on a DIY Tiny House
You can trim thousands without cutting corners on safety.
- Do the labor you can. Framing and painting and trim work are good DIY jobs.
- Buy materials in bulk. Order lumber and fasteners for the whole project at once.
- Look for salvaged materials. Reclaimed windows and doors and flooring can cut costs. Check them for damage and make sure they fit the plan.
- Keep the design simple. A plain roofline and standard window sizes cost less.
- Choose a shell kit. A kit gives you the structure and lets you finish the inside yourself.
- Compare quotes for trades. Get at least three for electrical and plumbing.
- Avoid change orders. Altering the plan mid-build is the fastest way to blow the budget.
Tools You Will Need
A basic kit covers most of the work.
- Circular saw and miter saw
- Drill and impact driver
- Level and square and tape measure
- Nail gun or hammer
- Chalk line and clamps
- Ladder and safety gear
- Caulk gun and utility knife
You can rent larger tools for one-off jobs instead of buying.
Which Jobs to Hire Out
You do not have to do everything yourself. Consider hiring pros for:
- Electrical wiring and panel work
- Plumbing and gas lines
- Foundation work and site excavation
- Spray foam insulation
- Inspections and permits if you are not confident
Paying for the high-risk jobs saves money in the long run since mistakes cost more than labor. If you would rather skip framing from scratch compare the options in our tiny house kits guide.
Common Mistakes When Building a Tiny House
- Skipping zoning and permit checks
- Buying a trailer that is too weak for the finished weight
- Underestimating the cost and time
- Poor insulation and ventilation
- Changing the plan halfway through framing
- Forgetting to plan storage
- Not leaving room for plumbing and electrical routes
Frequently Asked Questions
How do you build a tiny house step by step?
Decide on wheels or a foundation and check zoning and set a budget. Then choose plans and prepare the base and frame the house and weatherproof the shell. Insulate and install electrical and plumbing and finish the interior.
How long does it take to build a tiny house?
Owner builders often take six months to two years depending on their time and experience. A professional builder may take a few months once permits and plans are ready.
Can I build a tiny house myself?
Yes. Many people do. Basic carpentry skills and good planning help a lot. Hire licensed pros for electrical and plumbing if you are not experienced.
Do I need a permit to build a tiny house?
Usually yes when the home is on a foundation. A tiny house on wheels may be treated like an RV. Check with your local planning office before you start.
How much does it cost to build a tiny house?
Costs depend on size and finish. Owner builders spend less on labor. Professionally built homes often cost $30,000 to $90,000. See our cost guide for a full breakdown.
What is the best foundation for a tiny house?
It depends on your site and design. Piers and slabs are common for foundation homes. A tiny house on wheels uses a trailer instead.
How big can a tiny house on wheels be?
In most of the United States the limit is about 8.5 feet wide and 13.5 feet tall. Length and weight depend on your trailer and tow vehicle.
Final Thoughts on How to Build a Tiny House
Building a tiny house is a big project but it is a manageable one when you break it into steps. Check zoning first and plan your budget and hire pros for electrical and plumbing and take your time with framing and insulation.
Go in with a realistic timeline and a contingency budget. A well-planned build gives you a safe and comfortable home that fits your life and your budget for years to come.
Want a number for your own plan? Try our free tiny house cost calculator to get a low and expected and high budget.



3 Comments